I have Produced 100’s of these bows Manufacturing-Collection Design when I worked in Retail store Show.There is also a Macy’s bow that I have Produced 100′s of also.
This bow is stapled Jointly with the variation of tying when you are Utilizing Gentle ribbon. The stiffer the ribbon the A lot more poufy the bow will be. I Utilized satin ribbon so the loops Gentlely Tumble to the sides of the bow. This mirror hangs in my foyer. It is just two Older window sashes A single hung above the other and a Item of decorative mOldering on the Best. I Changed the Translucent glass with mirror panes.

I looped ribbon Close to A single of the snowflakes I Purchased at US Toys to use as Location mats for my Vacation table setting, and wired it to the Back again of the knot on the bow to attach. I Utilized a dot of Warm glue on the Back again of the bow to attach it to the mirror.
What You Need:

1.Ribbon- cut into 3 sections – loop, tail, and knot. For my bow I cut the loop –24” tail – 30” knot – 6”and all of my materials I found it at Yama Ribbon(Of course,you can buy ribbon online)
2.Stapler
3.Scissors
Steps:
1. Fold loop section in half.

2. Fold over again as shown and staple in the center to create the loops for the bow.

3. It should look like this. Set aside.

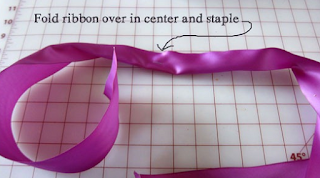
4. Find the center of the tail section, fold over and staple.
5. Making sure right sides of ribbon are facing front. Match up the staples on the tail and loop sections and staple them together.

6. Lay the knot section underneath and fold one edge over.

7. Tuck the raw edge under the folded edge, overlap to fit snugly and staple twice. If you have one of those little staplers – you can slide the stapler right in between the knot section and the loop and tail section so the staple will lay flat.

I rummaged through all my junk drawers and could not find one, so I had to staple on the outer edge of the ribbon because the bottom section of the stapler would not wedge under the fashion ribbon. It works, but the ribbon edges are raised up when they should be overlapping and then stapled.

Fluff the loops with your fingers. All done! This French Ribbon is 2 1/2 inches wide and the knot comes out a bit too wide for my liking.
It's so easy,Right?
This bow is stapled Jointly with the variation of tying when you are Utilizing Gentle ribbon. The stiffer the ribbon the A lot more poufy the bow will be. I Utilized satin ribbon so the loops Gentlely Tumble to the sides of the bow. This mirror hangs in my foyer. It is just two Older window sashes A single hung above the other and a Item of decorative mOldering on the Best. I Changed the Translucent glass with mirror panes.

I looped ribbon Close to A single of the snowflakes I Purchased at US Toys to use as Location mats for my Vacation table setting, and wired it to the Back again of the knot on the bow to attach. I Utilized a dot of Warm glue on the Back again of the bow to attach it to the mirror.
What You Need:

1.Ribbon- cut into 3 sections – loop, tail, and knot. For my bow I cut the loop –24” tail – 30” knot – 6”and all of my materials I found it at Yama Ribbon(Of course,you can buy ribbon online)
2.Stapler
3.Scissors
Steps:
1. Fold loop section in half.

2. Fold over again as shown and staple in the center to create the loops for the bow.

3. It should look like this. Set aside.

4. Find the center of the tail section, fold over and staple.

5. Making sure right sides of ribbon are facing front. Match up the staples on the tail and loop sections and staple them together.

6. Lay the knot section underneath and fold one edge over.

7. Tuck the raw edge under the folded edge, overlap to fit snugly and staple twice. If you have one of those little staplers – you can slide the stapler right in between the knot section and the loop and tail section so the staple will lay flat.

I rummaged through all my junk drawers and could not find one, so I had to staple on the outer edge of the ribbon because the bottom section of the stapler would not wedge under the fashion ribbon. It works, but the ribbon edges are raised up when they should be overlapping and then stapled.

Fluff the loops with your fingers. All done! This French Ribbon is 2 1/2 inches wide and the knot comes out a bit too wide for my liking.
It's so easy,Right?
No comments:
Post a Comment